


Transforming Glass: A Comprehensive Guide to Transparent LED Film Installation
Imagine walking past a retail storefront where the window itself is a vibrant, moving advertisement, yet you can still see clearly inside. Picture a corporate boardroom where data visualizations appear magically on the glass walls during a presentation. This is no longer science fiction; it's the reality made possible by one of the most exciting innovations in digital display technology: transparent LED film. These revolutionary led films are changing how businesses interact with their physical spaces, turning any glass surface into a dynamic digital canvas. But how does a simple sheet of glass transform into a high-definition screen? The magic lies in a precise and technical installation process. This guide provides a comprehensive, expert look at how transparent LED film is professionally installed, demonstrating why partnering with specialists like Digital film marketing is crucial for a flawless result.
What is Transparent LED Film? A Quick Primer
Before diving into the installation, it's essential to understand what makes transparent LED film so unique. Unlike traditional bulky LED screens, this technology consists of micro-LEDs embedded onto a clear, flexible, and self-adhesive film. This design allows it to be applied directly to existing glass surfaces without extensive construction or alteration.
Key Features of LED Films:
- High Transparency: Depending on the model and pixel pitch, these films can achieve up to 95% transparency, preserving the natural view and allowing light to pass through.
- Lightweight and Flexible: The film is incredibly thin and light, imposing minimal structural load on the glass. Its flexibility allows it to conform to curved surfaces, opening up creative design possibilities.
- Brilliant Display Quality: Despite its transparency, the film delivers bright, high-contrast images and videos that are vivid even in daylight.
- Scalability: The film can be cut and tiled together to fit virtually any glass size or shape, from a small door pane to an entire building façade.
Before You Begin: The Crucial Pre-Installation Phase
A successful installation is built on a foundation of meticulous planning. Rushing this stage is a recipe for complications. At Digital film marketing, our process always begins with a thorough pre-installation assessment to ensure every variable is accounted for.
Site Survey and Assessment
The first step is a detailed on-site evaluation. This involves more than just measuring the window. Our technicians:
- Measure with Precision: We take exact measurements of the glass area to ensure the film is custom-cut for a perfect fit.
- Inspect the Glass: We check the window for any scratches, chips, or imperfections that could affect adhesion or visual quality. We also identify any existing tints or low-e coatings, as these can sometimes interfere with the film's adhesive or performance.
- Assess Environmental Factors: We evaluate the ambient lighting conditions at different times of day. A south-facing window in direct sunlight has different brightness requirements than an interior office partition.
- Review Structural Access: We determine the safest and most efficient way to access the glass, especially for large or high-up windows, arranging for scaffolding or lifts if necessary.
Power and Data Planning
An LED display is only as good as its power and data connections. A clean, well-planned infrastructure is non-negotiable for reliable operation.
- Power Source Location: We identify the closest suitable power outlet and plan the most discreet route for cabling. For large displays, a dedicated electrical circuit may be required to handle the load, a task for a licensed electrician.
- Data Cable Routing: The display needs to receive content from a media player or computer. We map out the path for data cables (like HDMI or Ethernet), aiming to conceal them within window frames or conduit for a clean, professional finish.
- Control System Placement: The controller box and power supply units need to be housed in a location that is accessible for maintenance but out of sight, such as in a ceiling void or a nearby cabinet.
Choosing the Right LED Film
Not all led films are created equal. The right choice depends entirely on the application.
- Pixel Pitch: This is the distance between the centers of two adjacent pixels (LEDs), measured in millimeters (e.g., P4, P8, P16). A smaller pixel pitch means higher resolution and detail, ideal for close viewing distances. A larger pitch offers greater transparency and is more cost-effective for displays viewed from afar.
- Brightness: Measured in nits, brightness is critical. An outward-facing retail window needs high brightness (3000-5000 nits or more) to compete with sunlight, while an indoor display may only need 1000-1500 nits.
The Step-by-Step Professional Installation Process
Disclaimer: The following steps detail a professional installation process. Due to the technical nature and risk of damage to the product, we strongly recommend that transparent LED film be installed only by certified technicians like the team at Digital film marketing.
Step 1: Meticulous Surface Preparation
This is arguably the most critical step. Any dust, oil, or residue on the glass will compromise the adhesive bond and can create unsightly blemishes under the film.
- Deep Cleaning: The glass is thoroughly cleaned using a specialized solution, often a mix of isopropyl alcohol and distilled water, to remove any grease, fingerprints, or contaminants.
- Detailing: A clay bar may be used to pull out any embedded particulates from the glass pores.
- Final Wipe: The surface is wiped down with a lint-free microfiber cloth to remove any remaining static or dust particles, ensuring it is perfectly clean and dry.
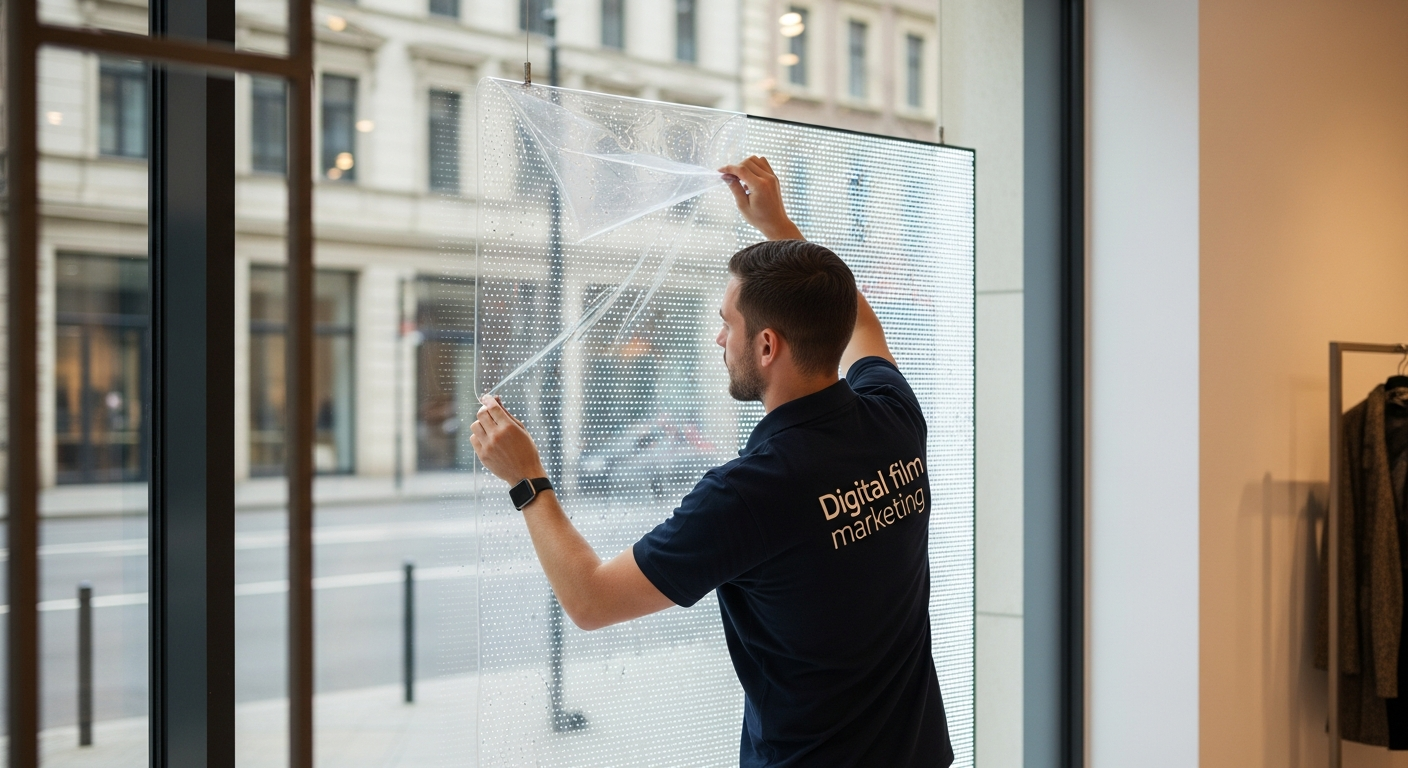
Step 2: Precise Film Positioning and Alignment
With a pristine surface, the film is carefully positioned. Using a level and laser guides, technicians 'dry fit' the film, holding it in place with low-tack painter's tape. They make precise reference marks on the window frame to ensure that when the adhesive is exposed, the film is applied in the exact correct position. For large, multi-panel installations, this step is crucial for ensuring the seams between panels are virtually invisible.
Step 3: The Application
This is where skill and experience shine. The technician will peel back a small portion of the film’s protective backing liner at the top. Aligning it with the reference marks, this top edge is carefully applied to the glass. Using a professional-grade felt-edged squeegee, the technician works downwards, methodically pressing the film onto the glass. They use firm, overlapping strokes from the center outwards, pushing out any air bubbles or application solution to create a perfectly smooth, bubble-free bond. This process is repeated slowly and deliberately until the entire film panel is adhered.
Step 4: Trimming and Finishing
Once the film is applied, any excess material is trimmed away from the edges of the window using a precision knife. This requires a steady hand to create a clean, straight edge that sits flush with the window frame or gasket. The edges are then 'sealed' by applying firm pressure to ensure a complete and lasting bond, preventing any lifting or peeling over time.
Step 5: Connecting the Electronics
With the film securely in place, the final step is to bring it to life. This involves:
- Connecting Power: The film's integrated power connection is discreetly linked to the main power supply.
- Running Data Cables: The data cables are connected and routed neatly to the controller box.
- Securing Components: The power supply and controller are mounted in their pre-determined location. All wiring is managed and secured to be safe and invisible to the public.
Post-Installation: Configuration, Calibration, and Care
System Configuration and Testing
Once everything is connected, the system is powered on. The technician uses specialized software to configure the controller, telling it the exact size and resolution of the newly installed display. They perform a series of tests, displaying color patterns and grids to check for any dead pixels or connection issues. Brightness, contrast, and color temperature are calibrated to match the environment for optimal visual performance.
Content Management and Training
A key part of our service at Digital film marketing is ensuring the client is empowered to use their new display. We provide training on the content management system (CMS), showing them how to easily upload images, videos, and create schedules for their content.
Maintenance and Care
Maintaining your transparent LED film display is simple. It should be cleaned only with a soft microfiber cloth and a gentle, ammonia-free cleaner to avoid scratching the surface. Regular checks of the physical connections are recommended, and any performance issues should be addressed by a professional technician.
Conclusion: The Clear Choice for Dynamic Displays
The installation of transparent led films is a blend of artistry and technical precision. While the final result appears effortless and magical, it is the product of careful planning, specialized tools, and expert execution. From the initial site survey to the final software calibration, every step is critical to achieving a stunning, reliable, and long-lasting digital display. By understanding the complexity of the process, it becomes clear why partnering with a seasoned expert is the only way to truly unlock the transformative potential of this technology.
Ready to turn your windows into a dynamic landmark? Contact Digital film marketing today for a professional consultation and expert installation that will bring your vision to life.